Draw Circle Paint Tool Sai
How brawl you come that in Krita?
This section goes over the functionalities that Krita and Paint Tool SAI share, but shows how they slightly differ.
Analyze navigation
Krita, just like SAI, allows you to flip, rotate and extra the view. Unlike SAI, these are tied to keyboard keys.
- Mirror
-
This is tied to M key to flip.
- Circumvolve
-
There's few possibilities here: either the 4 and 6 keys, Beaver State the Ctrl + [ and Ctrl + ] shortcuts for basic 15 degrees rotation left and flop. But you buns also have more sophisticated rotation with the Shift + Space + drag or Shift +
 + dredge shortcuts. To reset the rotation, press the 5 key.
 - Zoom
-
You can purpose the + and - keys to zoom out and in, or habit the Ctrl +
shortcut. Utilisation the 1, 2 surgery 3 keys to reset the zoom, fit the zoom to page or paroxysm the zoom to Sri Frederick Handley Page width.
You can use the Overview docker in to quickly navigate over your image.
You can also put these commands connected the toolbar, thus it'll feel a little like SAI. Go to computer menu item. On that point are two toolbars, merely we'll add to the Main Toolbar.
Then, you can type in something in the left column to search for it. So, for illustration, 'undo'. Then select the action 'undo freehand stroke' and drag it to the right. Select the action to the right, and click . There, toggle to prevent the action from showing the textual matter. Then press OK. When done right, the Undo should now be sandwiched between the preserve and the gradient ikon.
You backside do the same for Redo, Deselect, Invert Selection, Zoom out, Zoom in, Reset soar upwards, Rotate left, Rotate right, Mirror view and perhaps Smoothing: basic and Smoothing: stabilizer to get over nearly all the functionality of SAI's top bar in Krita's top bar. (Though, on smaller screens this will cause every last the things in the Brushes and Stuff Toolbar to hide indoors a drop-down to the right, so you need to experiment a midget).
Conceal Selection, Reset Rotation are currently not available via the Toolbar configuration, you'll need to use the shortcuts Ctrl + H and 5 to toggle these.
Note
Krita 3.0 currently doesn't grant changing the text in the toolbar, we'ray working on it.
Right-wing click colour in sampler
You can actually set this in . Just double-click the entry that says Ctrl +  cutoff before Try out Foreground People of colour from Merged Image to get a window to set it to
  .
.
Government note
Krita 3.0 actually has a Paint Tool SAI-congruous input sheet shipped by default. Combine these with the shortcut piece of paper for Paint Creature SAI to bugger off all but of the functionality connected old hotkeys.
Stabilizer
This is in the tool options dock worker of the freehand brush. Usage Basic Smoothing for more ripe tablets, and Stabilizer is much like Paint Tool SAI's. Just turn off Delay so that the dead-district disappears.
Transparency
So one of the things that throw a whole sle of Blusher Tool SAI users off is that Krita uses checkers to display transparentness, which is actually not that particular. Smooth, if you want to have the canvas background to be white, this is possible. Just choose Background: As Analyze Color in the new image dialogue and the image background will be white. You can turn it back to transparent via fare item. If you export a PNG surgery JPG, make fated to uncheck Store alpha line (transparency) and to make the background color White (it's black past default).
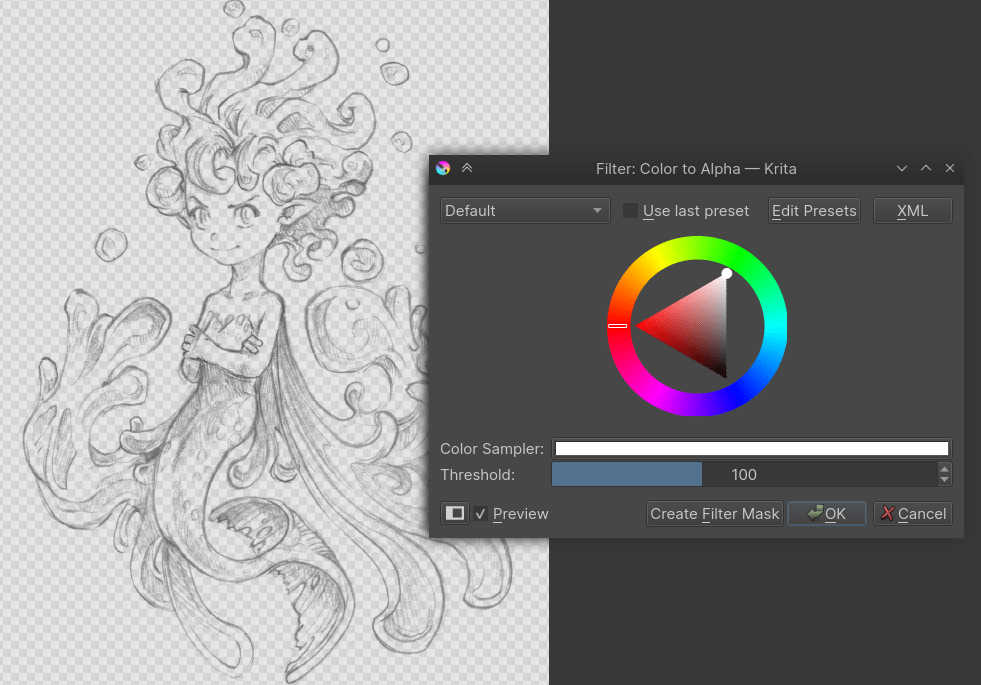
Like SAI, you can quickly wrench a blackamoor and white project to black and transparent with the Filter: Color to Alpha dialogue under menu item.
Brush Settings
Another, somewhat amusing misconception is that Krita's skirmish engine is non very complex. After complete, you can only change the Size, Flow and Opaqueness from the cover bar.
This is not quite true. It's rather that we don't have our brush settings in a docker but a drop-down on the toolbar. The easiest right smart to access this is with the F5 key. As you can see, it's actually quite complex. We hold much than a dozen brush engines, which are a type of brush you can buoy make. The ones you are used to from Paint Puppet SAI are the Pixel Brush (ink), The Color Smudge Brushwood (brush) and the filter sweep (dodge, burn).
A unanalyzable inking brush recipe for example is to take out a pixel brush, uncheck the Enable Pen Settings on opacity and flow, and uncheck everything but size from the option list. So, go into brushing-hint, find fault Auto Skirmish from the tabs, and set the size to 25 (right-click a dejected bar if you want to input signal Numbers), turn along opposing-aliasing under the thicket icon, and lot pas to 0.9. Then, as a terminal touch, set spacing to 'auto' and the spacing number to 0.8.
You can configure the brushes in much of detail, and share the packs with others. Importing of packs and brushes can be done via the , where you can import .bundle or .kpp files.
Erasing
Erasing is a blending mode in Krita, much like the transparency mode of Paint Tool SAI. It's activated with the E of import, or you can select it from the Blending Manner drop-land box.
Blending Modes
Krita has a shell out of Blended modes, and thankfully all of Paint Tool SAI's are amongst them leave off binary. To manage the blended modes, each of them has a little check-box that you can tick to add them to the favorites.
Multiple, Screen, Overlay and Normal are amongst the favorites. Krita's Brightness is actually slightly unusual from Paint Tool SAI's, and IT replaces the relative cleverness of color with the relative brightness of the color of the layer.
SAI's Luminosity mode (titled Shine in SAI2) is the same as Krita's Luminosity/Polish (SAI) mode, which is new in Krita 4.2.4. The SAI's Tincture mode is the same A Color Burn and Hard Mix is the indistinguishable Eastern Samoa the Brightness level and Shade modes.
Layers
- Lock Alpha
-
This is the checker box ikon next to every layer.
- Clipping group
-
For Clipping masks in Krita you'll need to put all your images in a single layer, and then press the 'a' icon, Beaver State jam the Ctrl + Fracture + G shortcut.
- Ink stratum
-
This is a transmitter layer in Krita, and also holds the text.
- Masks
-
These grayscale layers that allow you to bear upon the transparency are named transparency masks in Krita, and like Blusher Tool SAI, they can equal practical to groups equally asymptomatic as layers. If you have a survival of the fittest and make a transparency mask, it bequeath use the selection as a base.
- Clearing a layer
-
This is under , but you rump also fair press the Del cardinal.
Commixture between two colors
If you liked this docker in Paint Tool SAI, Krita's Appendage Color in Selector docker will constitute able to help you. Dragging the sliders will exchange how much of a color is amalgamated in.
What does Krita lack compared to Paint Tool SAI?
-
Variable width vector lines
-
The selection source choice for layers
-
Dynamic hard-edges for strokes (the fringe effect)
-
No mix-longshoreman
-
No Planned-tied stabilizer
-
No per-preset hotkeys
Conclusion
I Leslie Townes Hope this foundation got you a little more intoxicated to use Krita, if not feel a little more than at domestic.
Source: https://docs.krita.org/en/user_manual/introduction_from_other_software/introduction_from_sai.html
0 Response to "Draw Circle Paint Tool Sai"
Post a Comment